Showing posts with label art studio today. Show all posts

Wednesday, May 31, 2023

New Prices Now In Effect

New Prices Now In Effect

Thank you for all your support in so many forms.  Whether commenting on a post, sharing my reels, buying a piece of artwork, sending me an encouraging message, telling others you know about my artwork, and so on...every bit matters.  I enjoy all that goes into this art life and seeing how it can impact others.  I love having you on this journey!


All the little things add up and though it's not the most fun part of my creative pursuit, it is necessary art business.  Painting is the adventurous and mysterious part.  But at some point, I need to also pay attention to whether I am making ends meet.

New updated prices are now in effect.  I am an up front kind of person and it's important for me to get the word out to all of you.  As cost of art supplies, website fees, payment app fees, and shipping fees all increase, I must be on top of making sure it's possible to continue this art adventure in months to come.  New art is on the way...and we all know she must make art.

Shopify has increased the monthly cost for the basic website package and I am considering avenues for adding "Buy It" buttons for this blog and posting available work here on She Must Make Art.  I will research more and make a decision by fall this year.

I make the bulk of my sales through Facebook, Instagram, and Farmer's Market.  I know the value of having a website and mailing list so feel hesitant to make any big changes yet.  If that should happen, I will be sure to spread the word in all the ways possible.

I have one list of prices for regular artwork created on a daily basis.  I am basing these on a cost per square inch in the art piece dimensions.  The prices for regular artwork are decided so that I can enjoy choosing what I create and still be affordable for others to own some original watercolor artwork.  That balance is key.

 I have another list of prices for art commission work due to the nature of those projects including the time and steps required in the process.  These prices are also based on a cost per square inch on the art piece dimensions.  There's more time spent arranging for phone conversations or meeting by appointment in the studio.  There's a form filled with all the details to guide me in being consistent throughout the process.  There's the contract written and sent and filed to help clients feel heard and protected in the process.  There's the deposit, the sketch, the color swatching plans, the attention to details specifically important to the client...and so on.  It's a extremely personalized experience.  My clients are priority one.

The regular prices are posted in my art room as a reference when pricing artwork.  The art commission prices are posted on the Private Art Commission page.  If you should like a copy of these price lists, be sure to message, call, or email me and I will send you a copy.

Thank you,
Christy

-She Must Make Art


Friday, June 8, 2018

Lessons in Loose and Less Controlled

Lessons in Loose and Less Controlled by Christy Sheeler Artist 2018 - She Must Make Art

Letting Go

It's been a while but I'm here today and I've got some new watercolors in progress.  Because my art time is so limited now, the most recent projects are different.  I tend to work very tight, controlled and detailed when I paint.  Stepping out of my usual habits is forcing me to grow as an artist.  (The one here on far left is described more further on below.)  Can you relate with the struggle, working more tight and detail-focused in your own artwork?  Along the way, some tips on challenging yourself to be more loose with the brush and working less controlled in your own artwork.


The two paintings below are watercolors on Yupo surface.  It's not paper.  It's a plastic surface for watermedia or mixed media.  It takes some time and patience to work with in my experience.  With practice, it's been easier to adapt my strokes for a better result.  I enjoy working with this surface very much even though I've been so tight in my style for a long time.  The genius of this surface is it can all be rinsed and wiped away for a fresh new start.  The first landscape is done with a reference photo and the second landscape is just a fun imaginative journey.


Can you relate with the struggle, working more tight and detail-focused in your own artwork?  

In this post, 10 Tips for Working Loose and Less Controlled.


Waterfall Landscape on Yupo Surface


Watercolor landscape on Yupo surface.


I have followed Angela Fehr's work for a while on Facebook and love her YouTube videos for learning to relax and enjoy the watercolor medium.  Her work is so lovely.  She has online courses so I signed up for a free course on her website.  I'll link it here: Watercolor Jumpstart with Angela Fehr  

I wanted to keep myself painting even when my schedule is working against me.  She has such a positive way with explaining and she's easy to follow when she teaches.  I would say that if you are curious about taking lessons...go check out her courses.  You will enjoy yourself and she can take you from basics to advanced skills.

Here is the beginning stage of my project following along with her instruction.  This was my first time completely soaking my paper before beginning the first layer of color.  I loved this and enjoyed the time in my art room very much!  It's a mystery what will come of it and that's the fun of it.  The second photo below is further on in next stages...once the first layer of watercolor was dry.


Mountain landscape on watercolor paper.


Mountain landscape on watercolor paper, later progress.


This is the second project done with the online course.  She provides the art reference photos and they can be downloaded onto a pc or other device.  I had the photos downloaded onto my tablet so I could see them at my art table.  


Mountain landscape on watercolor paper.


The third of my works done through her online course is below.  This was an exercise in negative painting which is painting around an object to reveal its shape.  I was familiar with the technique but not excited to use it often.  It's a challenge to be sure!  She shares quite a few tips for making the negative painting process not so overwhelming.  
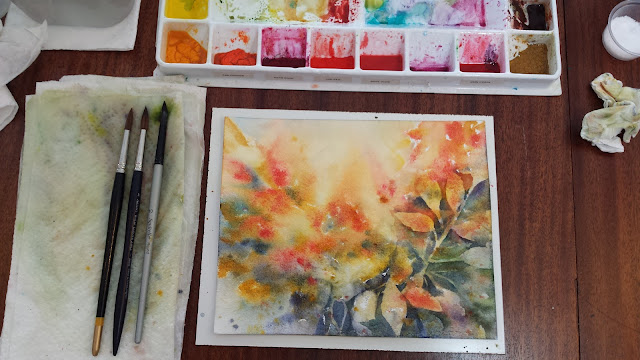


Negative painting with watercolor on watercolor paper.


This is the one I've chosen to revisit today but it didn't go very well.  If I'd seen this photo (taken over a month ago) while working on it today, I'd be much happier.  I faced two major problems.  The first, I couldn't remember which photograph I'd used for this project.  I searched and guessed it to be a similar photograph to the one showing below.  The second problem, I think I turned the painting upside down.  Ugh.  See, the work doesn't always go as originally hoped for in my art room, too.  I can scrap it altogether or I can see what can be done now.  Maybe this is the time to try washing it all off?  I'm not sure what I'll decide to do at this point.  


Early stage color washes in watercolor on watercolor paper.


The two photos below were taken after my painting time today.  I see that I chose the wrong photograph but right subject.  The watercolor paper should have been spun around but it could work as it is now.  Tough decision.  Not sure what I'll decide to do now.


Watercolor in progress with problems from previous session.


Watercolor in progress from today's paint session.


Today's warm up session was a quick landscape on Yupo surface.  It's done loosely with pale colors.  I used an art reference photo taken just a few weeks ago.  I don't love this one but I'm showing it anyway because you might think I turn out nothing but work that I love in the end.  It's so much more pale than my usual work.  It's an exercise in branching out for color scheme and less vibrant.  It's also on Yupo...so I will probably wash it all away and try again.  Love that about Yupo!


Quick warm up session today with watercolor on Yupo surface.


 It's been more productive in the art room for March, April and May in 2018.  Spring of 2017, I wasn't painting much at all.  I've been checking back to answer comments here as well as email.  If you've got questions, don't hesitate to contact me.  I'll get back to you as soon as I am able, usually 5-7 days.  Sheesh!  It's June now!  The days just fly by now.


10 Tips for Painting Loose and Less Controlled

1.  Block out the need to have an artwork for mat and frame.  Nobody has time for that pressure!

2.  Take 10-15 minutes to play on a smaller scrap of paper.  No expectations.  
      Warm up your mind and subconscious for creative energy to flow better.

3.  Try a new way of starting...like soaking the paper.  Be adventurous!

4.  Have an open mind about supplies and tools and techniques.  What would happen if...?

5.  Watch a painting tutorial that inspires you and then GO DO it yourself.                               
      YouTube is full of great videos that cost nothing.

6.  Be more aware of your self talk.  It's not just you thinking, "oh, what should I do now," 
       or "well, that didn't work the way I wanted," and "what should I do about this area?"  
       There are unsure moments in the process.  If it's really got me rattled, I lay it aside 
        and take a break (15 minutes) or I pick up another work in progress to get 
         my mind off of it for a while.

7.  This is hard work to move out of our comfort zone.  Don't expect it to come easily or quickly.        
      This retrains the brain, the eye, the hand, and the creative process.  Learning takes a lot of energy.

8.  Give yourself a bit of flexibility to be creative.  Set aside the art reference photo 
       and ask yourself how you want to paint this.  Take a glance now and then if it helps 
       relieve anxiety of needing direction.  Ask yourself how YOU want to paint this.  
       No one will see that photo.  It will not sit beside your painting.  It doesn't have to 
       match what the photo shows for accuracy. 

9.  Find a way to not stress over the supplies you're using.  We don't want to be adventurous 
       because this paper cost a pretty penny!  Paint on both sides of the paper.  Use it up.  
       Try washing the painting off...I'm going to try this soon.  Don't use cheaper paper.  
       Quality paper 140 lb. or 300 lb. is where you need to be.  I push myself to use only 300 lb. paper 
        now and it took years for me to get to that point.  YUPO!  Yupo is amazing.  
        It's a bit more money but you can really wash away all the paint and start again.  
        Rinsing it off in the sink will not damage it at all.  Stains?  Magic eraser.

10.  Do it all again.  Go back and remember the new methods.  Write yourself some reminders.  
        Repetition and reminders help us keep the new way of thinking and creating for the long term.


Thank you for stopping by the blog today!  Be sure to leave a hello in the comments.  You can find me on Instagram, Facebook, and Pinterest.  I'm most actively posting on Instagram these days because it's so quick and easy.


-Christy

She must make art.


Thursday, February 1, 2018

Coming Soon: 5 Steps - Watercolor Mixing Grid


Coming Soon Preview of Color Mixing Grids by Christy Sheeler at She Must Make ArtHey there!  I'm just so glad you stopped in today.  I want to welcome you to She Must Make Art.  I am Christy, an artist and lover of creating in all kinds of ways.  I enjoy sharing my own journey in making and loving art.  While life has thrown me a few curves and I'm not making art as often, I am here no matter what.

There's a new blog post in progress and I've got my plan for a tutorial describing my method for mixing watercolors and creating a color mixing grid.

The tutorial is written and edited so now it's time for brushes to do their job.  This is a tutorial that needs new photos taken as I create a mixing chart just for the purpose of showing my methods to you.  Once the photos are taken, edited and added...you'll be able to see something brand new.  Here.  From me.  Christy.  The artist.

So for now I'm just giving you a bit of inspiration for the next blog post.  Here are the photos taken as I prepared and began to paint cherry blossoms in watercolor last spring.  This was one of the most recent artworks completed before life changed in such a big way.  I'll share the progression of several watercolor paintings focused on cherry blossoms in a future blog post.  Can you see how I was just in the creating-watercolor-happiness-zone?  I really was!


A color mixing grid with watercolor.  © 2018 Christy Sheeler.  She Must Make Art.  All Rights Reserved.


Color mixing with watercolors and cherry blossoms artwork.


While the background is soft and pale, the layers of watercolor wash begin in a gradual process.  The watercolor mixing grid helps me stay focused as I work through the artwork.  


Cherry blossoms watercolor painting in progress.


Okay, well now I must be off to get the watercolor pigments on the grid.  I am excited to share it when it's finished!  Thanks for giving me the time to share and come hang out again soon!

-Christy
She Must Make Art.


Thursday, March 9, 2017

Change. What it really means.


Black and yellow butterfly landing on Indian Paintbrush wildflowers. Oh, spring, come soon.

The words to describe how much I need spring.  Right.  Now.  I love Montana.  I love it all year long.  I wish spring didn't take this long to arrive.  I grew up in Nebraska.  I've been in Montana since 1994.  It makes sense that I should have adjusted by now.  Nope.  I keep saying, "spring will come," and, "it's worth the wait."  Oh, and I tell myself the moisture makes for "happy farmers."  That's my reminder that there's good in more snow.

We've had more sunshine lately so that helps a bunch.  It melts off partially.  More light snow showers arrive to lightly coat everything again.   As I write at mid afternoon, it's 36° F and the sun shines so brightly.  I crave the sunshine.  I'm eager to have the days warmer, the hours of sunlight longer, the soil ready for planting seeds in a garden.

Adding to my longing for spring, I'm preparing for change.  There's good to come and yet there's sacrifice at the same time.  I'll soon have to rework when and how I work in my art room.  It's going to be a quiet place during the daytime hours. When the creative spark is lit in the evening hours, I would like to think I'll be drawn to this inspirational and relaxing place.

Creative energy...the artistic mind...it's a part of me.


It's been suggested that maybe I'll have to give up my art for the present time.  I just can't accept that.  Maybe that's what will come without my acceptance.  Creative energy...the artistic mind...it's a part of me.  I feel vibrantly alive when working with my brushes and palette.  Sorting through watercolor tubes for a specific pigment is so familiar to me.

...in the face of letting go and embracing the new.


What do we do with change?  How do we meet it?  Is there a wait to greet change with hope and joy?  Even if it's in the face of letting go and embracing the new.  I go forward because I'm choosing to be happy anyway.  What unexpected adventures are waiting for me?  I don't know, but I know it will be worth watching for the surprise blessings in the journey.

I'll share more another time.  For today, I'm contemplating these thoughts.  I'm doing a bit of clean up in my art room.  I've got some relaxing music playing.  The fish tank filter bubbles away like a water fountain.  The sunlight through the window blinds, creating shapes on the floor and wall, is warm and soothing.  I breathe deeply...feeling like I haven't been so aware of my breathe lately.  I need to breathe deeply more throughout my days.  I will sweep and vacuum a bit.  And then I'll glance at my art table and study that one area of the current painting that is driving me crazy.  Maybe I'll have an ah-ha moment of how I'd like to tackle that hollyhock blossom.  A way to move on and complete this artwork before my days adopt a different routine.

Can you relate to the ebb and flow of seasons for creativity?  How do you handle the change?


I'd love to hear your suggestions for working art time into your extra moments.

Until next Thursday...or when I can find spare time to write again...

-Christy

She must make art.


Thursday, October 27, 2016

African Violets in Bloom

A photo posted by Christy Sheeler (@christysheeler.artist) on

There's too much on my to-do list so this week, I'm checking in and saying a quick hello!

I've got an African violet on my desk, near the computer monitor.  There's just the right amount of filtered sunlight there.  With a bit of patience, water, and fertilizer, it will soon be blooming.  Fall is here now.  The days are shorter and the temperatures are cooler.  As I anticipate many months of busy activity here in my art room, I look forward to having houseplants nearby.

I've got a large project that's now officially underway.  It's a private art commission and it's large.  The details have been discussed and agreed upon with the collector.  The sketch is complete and now today, the first washes of color have been applied to paper.  More details to come soon!

-Christy

Thursday, October 20, 2016

5 Tips for Technique: Lifting Watercolor Pigment

Lifting watercolor pigment, 5 tips for this techniqueLifting Color From Select Areas

A trio of precious lambs, one of my works in progress, is the inspiration for tips shared today.  It makes perfect sense that watercolor painting is about laying down pigments on paper.  There's another technique that's also very crucial for bringing the piece to life.  

Lifting back color.  

This isn't possible with oils or acrylics once they've dried on the canvas.  Watercolor pigment, once dry on paper, can still be lifted to see more of the paper surface.  Lifting back to completely white is possible by scraping with a razor blade.  Some pigments are more staining than others.  The results will vary depending on which pigment is being lifted.  It's easy to do a search and learn more about your pigments; you should do this before choosing your pigments for a project.  If you think you might like to lift back color further into the project, plan for it.
The technique of lifting color has become key in my methods for creating depth in my artwork.  The highlights and the shadow are key components for developing form on a flat surface.  Would you like your subject to pop off the paper?  Are there areas you'd like to highlight?  Get ready, here we go!

Thursday, August 11, 2016

A note from the artist.

It's Thursday.  What's Up?

Well, life is interrupting my artistic schedule for a while.  That's just how it goes sometimes.  Our home has been full of activity, projects, Olympics and other random-spur-of-the-moment things.  I'm so ready to get back to the cherry blossom paintings!  My art room has been the focus of some renovations that will make creating here a more happy experience.  I'm working on some great opportunities for presenting my artwork at a local fair.  It's going to be a busy 4-5 weeks along with preparing my daughter and son for back-to-school at the same time.


There's plenty of artwork-related rambling and photo sharing here, so go explore a little bit!  You might find a post you'll enjoy while I try to catch up behind the scenes.


Thanks for dropping by and come again often!  I'll have more stories, tips, and artwork progressions to bring to you.  Watercolor paintings are coming along nicely and it's difficult to set them aside but that's the way life is right now!  The summer is drawing to a close soon so I'm taking time to be with my family and enjoy some downtime.  I'll be back with an update in two weeks!

-Christy
She must make art.


Thursday, August 4, 2016

Art Studio This Week: Baby Lambs and Cherry Blossoms

My husband and I have our photo taken along the trails.Ink Drawings and Watercolor Paintings

I am amazed.  The amount of progress made here is a wonder.  We've been going in so many directions this week!  Improvements are being made on my art room; I'm already so thankful for the work done to make this room more beautiful.  That door I had on my wish list...it's been stained and lightly white/gray washed and soon it will be hung back in the doorway.  That is going on plus so much more!  I won't complain because it's all such a gift.  My parents are visiting and they find major projects to complete while here.  They run circles around me, seriously.  I'm the multi-tasking manager and overseer of projects in progress so I'm staying busy, too.  Having the early evening opportunity to add something here on the blog is a tentative undertaking.  I'm not sure how much I'll be able to share before I'm pulled away again.


An artwork completed recently focuses on baby lambs.  The day I took the reference photos (over a year ago), I was sure it would be a watercolor painting some day.  I wasn't sure when the urge would hit to take this subject on.  This past two weeks a pencil sketch and ink drawing have been taking shape at my art table.  What a pleasure it's been!  

There's no way of knowing which art works will flow and which will not...  It's unexpected.  After years of avoiding animals as a subject matter, I may have changed my mind.  It will be several weeks before the sketch will be ready to begin painting with watercolor paint.  

I've been making my preliminary sketches on tracing paper for over a year and it's my favorite way to work.  Once the pencil sketch of the lambs was complete, I laid a heavier weight piece of tracing paper over it.  The ink drawing was guided by the sketch on the layer below it.  The classic quill dip pen and nib with India ink was such a great way to go here!  The amount of control and fine details made this a success all the way.  

The art reference photos were taken at the Snyder place and while telling Susan about them, she lit up!  She's the reason for the ink drawing.  She made arrangements with me to have the finished jpg image for an invitation she's having printed.  I hope to have the chance to share with you how it looks once its been printed!


The pencil sketch of lambs on tracing paper.


Using 2 layers of tracing paper, I create an ink drawing from the pencil drawing.


The ink drawing of a lamb on thick parchment paper and the photo reference in the background.


I continue with the quill pen and India ink, creating textures for the lambs' wool and barn boards.


The completed ink drawing Lambs by Christy Sheeler 2016.  She Must Make Art.
©Christy Sheeler 2016.   All Rights Reserved.  She Must Make Art.  Lambs Ink Drawing


The cherry blossoms watercolor paintings are continuing with much joy in the progress.  My work space may seem overwhelming but it's all in order, really.  Yes, I really do need that many color mixing grids.  Yes, I do need that many different watercolor pigments, though I use only a third of what is showing on the tables.  

My newest additions to the paints are Daniel Smith and they are wonderful pigments.  I wished I'd tried them years ago!  

I've got five backgrounds done at the present time.  I'm working on the details of a single painting this week.  A few days ago, I began working on layering in for the branch, leaves and flower petals.  With the application of masking fluid for finer details, the piece is taking shape nicely.  It takes great concentration in the beginning stages as I map out areas in the pencil outline.  I can easily feel confused about what is flower and what is background!  With deep thought, I study my reference photo and lay the colors in from one area to another.  I am pleased to share photos of the progression so far!


A full view of my art table with the cherry blossoms paintings in progress.


Five backgrounds completed for the cherry blossoms watercolor paintings.


Color mixing grid for new pigments from Daniel Smith in preparation for the cherry blossom watercolor paintings.


One of the cherry blossoms watercolor paintings in its beginning stages.  The three tubes of watercolor used for the background.


First layers of watercolor paint laid in for the main subject, cherry blossoms.


With several layers of watercolor, the main subject begins to pop, cherry blossoms come to life!


The current work in progress, cherry blossoms in watercolor.


This summer has been a challenge for me to make significant progress in my art room.  My efforts here on the blog have to be simplified in order to keep up with my weekly posting goal.  Persistence and flexibility are key in my daily schedule.  

So I am still here, making time to be creative on a daily basis, though my hours spent painting are less.  Quite a few changes in the art room have already made me look forward to autumn days spent painting with my watercolors!  


I'm continuing to add new Giclee art prints in the Etsy shop ChristySheelerArtist.  Have you checked out my shop lately?  Check out my Contact Page for all my many art related links!  There you'll find me on all the various platforms where I share my enjoyment of art...we can trade art tips and secrets!

So, for this week...(my weekly posts seem to post later each Thursday this summer) I am Christy, an artist, sharing my artist's journey here, because it's really happening every day.

What artistic pursuits are you chasing after, finding ways to make time, making art a part of your days?  I'd love for you to share here or on my Facebook artist page.

Enjoy the summer evenings, the sunsets, the cool breezes!

I'm aiming to meet you back here next week...someway or another.

-Christy

She must make art.


Thursday, June 23, 2016

Kayaks, Summer Sketches, Cherry Blossoms & ICAD 2016

Watercolor sketch done at the lake.  Travel palette holds the watercolor mixes.

Summer is a crazy kind of different!


The daily routine is just not the same.  What time do we get up now?  When is lunch?  What should we eat? (Can't I just go back out to my art room?)  Can we really call it a routine?  Like making my way through a darkened room, I am feeling my way through the non-scheduled months.  It's a feat to keep some sort of routine especially where art is related!  It's easier if I'm being flexible.  In the back of my mind, there's a commitment to not relapse into an artistic drought.  At this time last summer, my art room was just beginning to be situated for daily use.  Many new routines and goals are in progress now.  While I want to hold on to making art, I don't want to miss the joys of summer!  Children are at home for the summer days.  We all adjust.  I embrace life in this season.  These days zip by and won't be back again!


We've got two kayaks this season; they are such a great addition to our family time on the area lakes/reservoirs.  We'll have many summer afternoons spent on the water.  There's just something so therapeutic about water.  A few strokes of the paddle and I'm in the middle of this expanse of water.  A new perspective of the land and the surface below makes me want to take pause and soak it up.  Now that our kids are in their teens, we focus on what will interest them so they'll look forward to family getaways.  Here, we think we've scored in that department!  They have always loved the water, but the days of rolling up your pant legs and wading along the shore are gone.


Two kayaks on the lake shore, one green and one blue.  Summer spent on the water is relaxing.


Monday, June 13, 2016

Shooting Stars Graceful Giclee Print in the Etsy Shop!

Giclee Print of Shooting Stars Graceful by Christy Sheeler Artist
Etsy Shop Announcement!

Shooting Stars Graceful
8" x 10" with 1" white border, signed in pencil within white border.
Packaged in a clear cellophane sleeve.

$45.00 plus shipping and handling.


A delicate trio of shooting stars with noses pointing in all directions, these pink beauties have a gentle touch.  This wildflower is one of my favorites as it is for many others as well.  These tiny treasures when bountiful will turn a whole field magenta!  That's one of the awe inspiring things about wildflowers, they spring up where you would least expect and can survive the hardest conditions.

Shooting Stars Graceful Giclee art print comes without a mat.  With a mat, it will slip into a standard 11" x 14" frame.  It's printed with archival grade inks, a quality Giclee print on a textured natural white paper similar to watercolor paper.  This fine art print of the watercolor painting by the same title is available here in my art studio, aka the solarium.  I'm keeping a limited number of prints on hand but I'm able to get a new order of prints within a short amount of time.  I package and ship within 3 to 5 days of receiving the order.

I've got beautiful and unique handmade cards to give as a free perk to every purchase.
Click here to purchase this Giclee art print in the Etsy Shop, Christy Sheeler Artist!


Giclee Print of Shooting Stars Graceful by Christy Sheeler Artist


Giclee Print of Shooting Stars Graceful by Christy Sheeler Artist


Giclee Print of Shooting Stars Graceful by Christy Sheeler Artist


Giclee Print of Shooting Stars Graceful by Christy Sheeler Artist


I'll be back in a few days with a new post...hoping to have new watercolor paintings in progress this week!  We took the kayaks out on Lake Francis yesterday...I sat at the picnic table with my travel art kit and there's now one more quick watercolor painting in the sketchbook!

Right now, my garden could use some TLC and I still haven't picked up tomato plants to add to the raised beds!  Our summer routine is still not really a routine at all!  My uninterrupted time seems to come in short supply.  I'm trying to find a balance in it all.

-Christy
she must make art.


Thursday, May 26, 2016

Moments Worth Pausing For

balloon garland on cotton stringIt's my day for writing and preparing to share the week's art studio happenings.  As much as I want to keep up with everything, I realize my limitations. I've got a commitment that comes first.  My son's eighth grade recognition is next week.  It's a big celebration for his class and I'm fortunate enough to help with the decorating team.  I've promised my kids that when it comes right down to it, family comes first.  This is an event that won't come back around.  I love being involved and being available for these milestones.

How many balloons make an 18 foot swag anyway? (60) Will a glow stick tucked into a balloon really work? (not really)  And so on with so many great Pinterest finds... finding out which clever ideas really work.  I've found that the dollar store is the best starting point for any party decor planning.  It's difficult to decorate on a budget!  Oh, and if you want to sandwich glow stick bracelets between two clear plastic cups, take the glow stick with you to be sure the clear plastic cup will be the right size!


Throughout the past year, I've learned that there are times when it's okay to take a break from the art studio.  I've been able to establish that routine and it won't be impossible to pick up again soon.  So, while I'm not posting a lengthy piece with a great number of photographs today, I am checking in and saying hello!  I'm still here, just focusing on glow sticks, balloons, table centerpieces with a Rocky Balboa printed on the vellum wrap, etc.

We'll be using red, white, and silver balloons for the party.  I had these assorted balloons here at home.  I wanted to have an idea of how many balloons would be needed for the desired effect.


testing out how many balloons for every 3 feet of garland
Here's the test run for number of balloons to 3 feet of garland.


The vellum wrapped vases are my favorite way to make a fantastic eye-catching centerpiece.
Here is a snapshot of the supplies I used.  Comment below if you have any questions!  The vellum is 8 1/2" x 11" sheet and I print on it with my inkjet printer.  I set the page format on landscape and centered the text on the page.  For the shorter vases, I trimmed an inch from the top and another inch from the bottom, making the sheet 6 1/2" x 11" in size.


I printed the class quote on the vellum with the page format in landscape style.  Zots (have you heard of these?) are the most wonderful way of attaching the vellum to the vase.  Three little dots of the clear adhesive dots at the left and right edges and the vase is wrapped!  That's when I realized I had forgotten a step.  The silver glitter tape to trim it needed to be added.  The one below was my first try at applying the glitter tape after the vellum was attached to the vase.  You can see a wrinkle in the tape and it is unevenly attached.  This tape does NOT come back off without some damage to the tape and the vellum.  I was better off leaving it for this vase.  For the remaining sheets of vellum, I attached the silver glitter tape while the vellum lay flat.


vellum wrap with text wrapping a tall vase, silver glitter tape accent


If you're curious about making something like this vellum wrap for tall glass vases, I shared the instructions in a December post.  See Christmas Tea: Part 2 for more information.  For the set I'm working on today, I created them with Canva.  It's a very handy online tool for building your own graphics.


white string lights and glow sticks with votive light in glass vases


I tried several different combinations to find the best way to light up the vases.  The glow sticks are much more impressive in a darkened room!  If you want the neon, bright colors of glow stick I would suggest using 8-12 glow sticks per vase.  I really like the string lights but I have more of the glow sticks and battery operated votive candles.  I purchased iridescent shred gift bag filler (like Easter grass) at the dollar store.  The very best effect I achieved was using a handful of the filler and the string white lights.  The shred filler is so prone to static cling!!!  Spray your hands with Static Guard for better results.  This is so much fun!  Now to go build four more!!!  (If you look closely, you'll see a jar of Hot Tamales candies; I have a serious sweet tooth!  I'm sure candies show up in many of the studio shots.  I don't even realize it anymore.)


vase centerpieces, quote printed on vellum, vellum wrap for vases, silver glitter tape, glow stick, battery operated lights


Wait, what just happened?  For not actually planning a blog post, it seems I've got one.  It wasn't so hard to complete and hopefully you have a new idea to try!  Please feel free to explore the other posts I've shared in the past.


vellum wrapped vases, custom touches on a small budget, table centerpiece, party decor


Thank you for stopping by and be sure to return again soon!
I'll be back in a week...or two.  The next week and a half will be busy but I'll be thinking on what to share next time.  I want to share posts with quality and purpose.

We're going to attempt at least one trip to the mountains so some photography with wildflowers ought to be coming up soon.  That art travel kit is packed up and ready for our next adventure!

I'll do what I can with what I have.  I am enjoying this everyday creativity too much to put it down for an extended length of time.

What are you making time for?  Is there a creative type of outlet that you feel drawn to from time to time?  What's stopping you?  Be intentional.  Don't expect it to come together all at once.  What would be a first step toward filling that void?


-Christy
she must make art.

P.S.  I've got plenty of new listings to be added to Etsy in the weeks to come!
        Are you following me on Facebook?  I share updates there for new blog posts, new Etsy    
        listings, along with other art related information I find elsewhere.