Showing posts with label art tips. Show all posts

Thursday, February 14, 2019

Exploring New Mediums with Watercolors

Exploring New Mediums with Watercolor Blog Graphic Christy Sheeler Artist I have new mediums in my stash.

It's like Christmas morning.  New art supply order arrives and I am a child again.  Excitedly, I search through the package for mediums for my art supply stash.  I am in love with exploring new methods and techniques.  My mind gets lost in thinking about new watercolor possibilities for future artworks.  Sometimes, I need to shake up my artist techniques a little bit.  Can you relate?  I have three new mediums to share today.  I have been testing out how they can work with my watercolor painting process.  Here's the scoop on what I've grasped so far!


I had a specific reason for trying out these mediums:


Watercolor paper can lose its sizing.  


I have experienced watercolor paper that is no longer its original best which is frustrating.  I learned to buy only the paper I need for several months.  Great changes in temperature and humidity can affect the sizing.  My art room wasn't always heated and so the range of temperatures was hard on my paper.  You might still be asking, "what is sizing?"  Watercolor papers are treated with a substance like gelatin that makes the surface less absorbent.  The watercolor pigment and water can float on the surface.  When a paper loses its sizing, the color and pigment sink down quickly and cannot be lifted out.  Many times, a strange speckled texture appears in the paper surface.

I want to add that the papers I have had issues with sizing-wise were high quality 140 lb. watercolor papers.  This is not about cheaper paper, though it can happen with any quality of watercolor paper.

If you would like to learn more about watercolor sizing:  Birgit O'Connor's blog explains this with more detail.  If you would like to see examples of what to watch out for:  Karen Sioson's blog describes these paper problems along with photos.

I have odds and ends of 140 lb. cold pressed watercolor paper in my paper stash.  I would like to be able to treat those papers so I can still paint on them.  My search began with wondering if these mediums would be an asset for this purpose.


I have been playing with these three mediums to understand them better.
For each medium, I first want to know...

Question:  Will this medium work to help with sizing problems?


---------------------------------------------------------------------------------
Before you begin trying any of these:
1.  Set up a work area away from watercolor palette.  Don't let any of this mix on your palette.
2.  Use a water container that you'll rinse well afterwards.  You probably don't want any of this to migrate to your watercolor painting sessions.
3.  Rinse your brushes well and right away.
---------------------------------------------------------------------------------


The Mediums I Explored with Watercolors:

QoR Lift Aid 118 ml. $8.74
Holbein Sizing Liquid Medium 60 ml.  $12.39
Daniel Smith WC Ground Titanium White 4 oz.  $8.19
(Prices at time of order from Cheap Joe's Art Stuff, 2018)


Lift Aid by QoR-------------------------------------------------


Lift Aid by QoR bottle 118 ml


I am not sure why I thought this would be a possible solution.  I was all out determined to find some options.  The QoR lift aid peaked my curiosity.  Lifting back to white can be a challenge and I like the idea of having some extra assistance.  Don't get me wrong.  I am not going to be prepping all my watercolor paper before I begin paintings.  

Thursday, January 31, 2019

Watercolor Success on YUPO


Watercolor Success on Yupo blog post by Christy Sheeler Artist 2019. Are you up for a challenge?


Watercolor is an adventure all on its own but if you are up for more challenge, you might give Yupo a try.  I am here to give you some pointers that will improve your experience.  Though it may seem foreign and scary at first, after a few painting sessions, you might just fall in love with this unique surface.  Shake up your creative process and take a break from the usual watercolor techniques.  While you may wonder whether you will ever get the gist, be willing to explore the possibilities.  Do you remember sitting in a classroom as a child, looking wistfully out the window, waiting in eager expectation for time on the playground?  Time.  Time to do as you wished without the rigid instructions and limitations.


Sometimes, I need more play with watercolor.


Like me, perhaps you have a underlying wish to break out of a rut, be more fluid and less confined by the traditional methods.  I wanted to be more free to watch the watercolor pigment spread as water carried it across the surface...without the stress and guilt of "wasting" a sheet of watercolor paper.  Are you ready?  Let's get on with this adventure!


What is Yupo?


You might be asking me, "what exactly is Yupo?"  That's a good place to begin.  Yupo is a synthetic paper that is tree-free.  This surface is 100% recyclable, smooth, very durable, tear-resistant, waterproof.  It resists buckling that usually occurs with cotton watercolor papers.  It does not absorb the pigment.  There is no need to tape Yupo on a board.  Pigments remain vibrant and white of the surface is easily restored.  Most often, artists use alcohol inks on Yupo but other mediums can be used as well. There are two different weights of Yupo offered:  74 lb and 144 lb.  For the purpose of watercolor painting, 74 lb. is more than sufficient.  There's also a translucent Yupo but I have not explored watercolor options there yet.  Yupo's available where art supplies are offered.

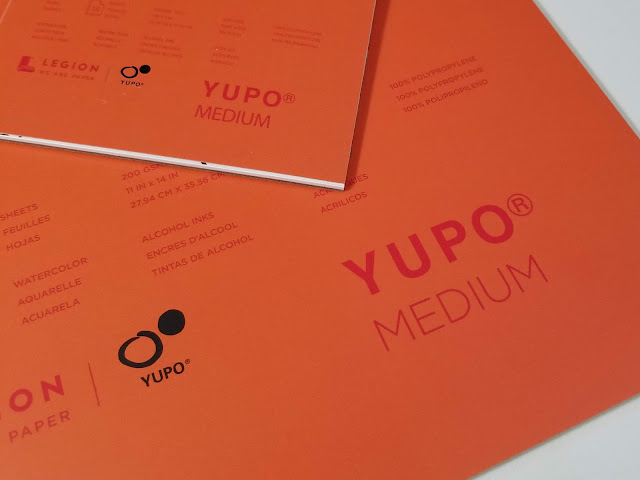
Here, I show you two sizes of Yupo 5" x 7" and 11" x 14" with 10 sheets per pad.The smaller pad was $4.93 and the larger pad was $16.82.  They were purchased from Dick Blick.  The 20 sheet pad (74 lb.) of Yupo costs $16.99 on Cheap Joe's Art Stuff presently.


Yupo synthetic paper in various sizes.


Yupo synthetic paper in various sizes.


What I understand about Yupo so far...


 In a previous post (January 2016) , I shared my first experience with Yupo.  I will link the post titled Watercolor Adventure with Yupo here.  I had fun playing with Yupo and still do.  At that time, I needed more time painting on this new surface.  The hours spent gave me a better comfort level and results.  My favorite subjects are landscapes and flowers.  I wanted to challenge myself to be less detailed and tight with my technique.  At first, I felt like I would never have the knack for anything representative of these subjects.  I will admit it's a long stretch to find how to bring watercolor to Yupo in a way that connects with my style.  Each time that I returned to "play" on Yupo with my watercolors, I was more pleased.  The artwork is now something I enjoy looking at and displaying for others to see.


Watercolor painting on Yupo paper back in 2016.
My first major session of experimenting with Yupo back in 2016.


So, let's move on to my tips for watercolor success on Yupo.


Starting with the basics:


1.  Yupo is made from polypropylene.  It's not a paper at all.  
2.  It's an alternative surface for painting and ink.  
3.  It does not absorb color at all.  Watercolor paint can be lifted off to bring back whites.
4.  Prep the surface using a cotton ball and rubbing alcohol.  This removes oils left by fingerprints.
5.  Draw with water-soluble pencils.  Look for water-soluble graphite pencils.  Draw with watercolor
     pencils instead of graphite.  Do not erase.  Eraser marks act as a resist.
6.  Paint once to add color; paint twice and it will lift color.
7.  More watery color mixes will take longer to dry.
8.  When complete, the painting needs to be sealed with a Krylon matte sealer.

Those are the basic guidelines I understood when I first began experimenting back in 2016.  I had been aware of Yupo for quite a few years but had avoided it.  I feel better knowing many watercolor artists are still avoiding it like I did.  Still, it's worth the risk and you might find it's your new love.

Saturday, February 3, 2018

5 Steps For Making Your Own Watercolor Mixing Grid

Painted watercolor squares with title, 5 Steps for Making Your Own Watercolor Mixing GridPlan Your Mixing For Better Creative Flow

I use mixing grids as tools, because it saves so much guesswork.  Clearly seeing which mixes I want to use in my work,  I am less frustrated and make fewer mistakes.  It's less, "oh, I don't like that!"  There's more "oh, it's coming together!"  

Would you like to make one?  Does it seem intimidating?  Can I give you some tips to get you started?  It's an enjoyable process, methodical yet relaxing at the same time.  In the past, artists have shown interest in making a chart like this.  It's just paper and paint.  Really.  I promise.  Don't hold back because I'm just sure you can handle it.  

(Well, no...I don't know you that well...what do you have to lose?  You might have a great time!)


After the many years I've painting with watercolors, there's a stack of various watercolor paper scraps with free form brushstrokes of color.  Each one of these pages is a record of my time exploring how to achieve a certain mix for a painting.  The earliest mixing "notes" are filled with blobs of color with a few scribbled notes in my handwriting.  I sorted this stack into the following collections.  Some of them instantly take me back to the specific painting, others not so much.  It's interesting to see how my methods changed over time.


Various collected watercolor mixing grids with written notes.


LET'S BREAK IT DOWN.

Supplies:
Watercolor paper (I'm using 300 lb. cold press)
Pencil
Fine-point permanent marker
Straight edged ruler
Watercolor pigment
Watercolor brush
Watercolor palette
Container of rinse water
Paper towels


Watercolor supplies: paint palette, paint tubes, container of rinse water, pencil, permanent marker, ruler, paintbrush, paper towel, watercolor paper.


1.  Choose your pigments.  

Keep the number limited.  How about the primaries, and then a few other pigments you're curious about trying out.  I usually begin by comparing my reference photo with my favorite reference book, The Watercolor Painter's Pocket Palette by Moira Clinch.  Over time, I have saved my mixing grids from previous artworks, and those are also great tools now.  So, for the hollyhocks as my photo reference, I've chosen these watercolor pigments.

I chose Daniel Smith Quinacridone Coral, Daniel Smith Quinacridone Red, Windsor & Newton Transparent Yellow, Daniel Smith Quinacridone Gold, Da Vinci Cerulean Blue, and Daniel Smith French Ultramarine.


Tubes of watercolor pigment.


Thursday, October 20, 2016

5 Tips for Technique: Lifting Watercolor Pigment

Lifting watercolor pigment, 5 tips for this techniqueLifting Color From Select Areas

A trio of precious lambs, one of my works in progress, is the inspiration for tips shared today.  It makes perfect sense that watercolor painting is about laying down pigments on paper.  There's another technique that's also very crucial for bringing the piece to life.  

Lifting back color.  

This isn't possible with oils or acrylics once they've dried on the canvas.  Watercolor pigment, once dry on paper, can still be lifted to see more of the paper surface.  Lifting back to completely white is possible by scraping with a razor blade.  Some pigments are more staining than others.  The results will vary depending on which pigment is being lifted.  It's easy to do a search and learn more about your pigments; you should do this before choosing your pigments for a project.  If you think you might like to lift back color further into the project, plan for it.
The technique of lifting color has become key in my methods for creating depth in my artwork.  The highlights and the shadow are key components for developing form on a flat surface.  Would you like your subject to pop off the paper?  Are there areas you'd like to highlight?  Get ready, here we go!

Thursday, May 19, 2016

An Artist Packing For Summer: Watercolor Art Kit For Summer

It's Time To Pack Art Supplies!

May is here, spring is in full swing, and it's high time to be packing that art bag.  Is it time yet?  I'm ready to take off for the mountains.  There are trails to explore and campfires to build!  My husband leans toward spontaneous more often than not.  For anyone who knows us personally, you could say that's a huge understatement.  I am the grown-up Girl Scout Brownie who has an addiction to preparedness.  Well, aren't we a fine match?!  I am very entertaining while hurriedly running around to pack up the essentials just before we head off on another day or weekend adventure.  I've mentioned this before but here it is again.  I have packed up a bag of art supplies every summer for nearly 20 years of our marriage.  I used the art supplies more frequently before the busy summer days of motherhood.


While I'm at the lake or in the mountains with our family, I feel like I need to be present...and sometimes I think they see photography or watercolor painting as bringing my work.  It's work and pleasure all rolled into one.  Photography is much easier to fit in with us constantly being on the move to somewhere else.  I keep packing the art supplies because it's my habit. I'm sure one day the opportunity for a fast watercolor sketch will present itself!  I continue to pack and carry this bag because one of these days, I'll be painting up a storm while I'm right there on location.  Let's begin with the bare bones basics of art supplies for making some watercolor art in nature.


The Watercolor Travel Kit

The Basic List:


  • watercolor paint palette with travel brush
  • watercolor sketch book
  • pencil and eraser
  • water container
  • paper towels
  • sunscreen
  • hat with wide brim
  • sunglasses
  • shirt for extra protection from sun


basic watercolor supplies necessary for traveling artist


This would be the list of most basic art supplies I pack to take on the road with me.  With my love of art supplies, I have a difficult time with packing quite a bit more.  (Yeah, you know me too well and you're probably saying, "no kidding.")  The what ifs run through my brain and before I know it, half the studio is now packed in that bag.  Laugh about it.  I don't mind.  It's all true.

The watercolor palette is Royal Talens.  It has its own travel brush.  There are quite a few other nice travel watercolor palettes available.  I prefer a mechanical pencil out of personal habit.  It doesn't need sharpening.  I just pack extra lead in the core.  The watercolor sketch book features pages 5" x 7" in 140 lb. weight.  This means there's some buckling from painting but not as much as a sketchbook meant for drawing.  A powdered drink mix container was saved and cleaned for new use as a water container.  Some artists use a collapsible cup and water bottle.

Here, at higher altitudes, the sun exposure can really do a number on my skin.  For the first half of the summer, too much time in the sun means I'm broken out in a rash.  The Badger kids spf 30 sunscreen is scented with tangerine and vanilla.  I cannot stand other sunscreens but this one is now my favorite!  The wide-brimmed hat, sunscreen and lightweight shirt with built in sun protection are a must.  I can't leave them at home.

Thursday, April 14, 2016

Sketching Subjects with Mechanical Details


Sketching Subjects with mechanical details, sketching before the painting happens, artist process, drawing for proportions, using grids to sketch


The Beginning of The Vintage Tractor in Watercolor


My subject matter for the current watercolor painting is different than recent paintings.  The vintage tractor has sun-faded paint,  rust, dents, and wonderful textures!  Add all that color and it's practically begging me to put it on paper.  It's a big change, not quite the same as a landscape or flowers.  While the flower has its own tiny details to conquer, there is more wiggle room for the artist.  If the petal moves a little to the left, it's just fine.  If the stem is a little longer, no problem.   I can always add a few more leaves.  Well, I'm not giving myself an easy challenge here but I still can't resist.  That -and my husband is really, really excited about watching this one come together.  

What about subjects with more mechanics, pieces and parts?  You see, if it's a subject matter that others know well and proportions are off, there's a problem.  This is something I've faced before with subject matter like vintage automobiles.  Now, the current watercolor painting in progress, a vintage tractor is the same.  The sketch used is the foundation of the painting.  Careful planning is necessary for the sketch to be completed.  Are you curious about how that drawing begins?

How does an artist plan out the detailed sketch?  

Are there tricks that help make it more successful?  


That's what I'd like to share today!

First, I'll show the original photograph, where this all began.  On a Saturday morning, my husband and I were checking out all the great finds available at Timeless Tom's.  We both enjoy the hunt for something we must have...it doesn't matter that we weren't really looking for it.  I've got a love of searching through all the variety of items he brings from farm and estate auctions.  The tractor didn't come home with us.  With my camera, I was able to snap a few photos of this one-of-a-kind homemade tractor.


Vintage tractor photograph, art reference, repurposed automobile parts


Once the photo is imported into photo editing software, I can make any needed changes for using it as an art reference photo.  That might include cropping, adjusting the fill light and highlights, and increasing the color saturation.  I save that version.  Then, I create a version with some more noticeable filters applied.  This version has more artistic license.  It's my rough draft guide to where my creative juices want to take it in the final painting.  Let me say, if you really like that version, I could order the photograph as a print on fine art papers or canvas.  Let me know.  We'll talk.


Edited photograph vintage tractor, filters applied.  Second art reference photo used for artwork.


I have my reference photos printed online or at a local photo kiosk.  For this project, I have a printed copy of the second version with the editing done.  These tips can be followed with photos displayed on a tablet as well.

Wednesday, March 9, 2016

Why I Make Color Mixing Grids

Let me begin by saying that not every artist does it this way. 


 Some use washes of pigment, adding in layers on top of layers...the previous one dry before another is added.  Some artists change pigments as they paint, letting one color meld into another.  It is such a fun sight, seeing the color mix right there on the paper.  And some, like me, get caught up in the possible combinations (endless?) of mixing various pigments!

Every artist has their methods.


It's great experimentation to see the results on paper.  Add to that, the ways the result can change by diluting with water, changing the proportions of pigments used, adding a third pigment.

Have I lost you already?  I hope not!

Color mixing grids have become a key part of my preparations for painting watercolors.  I usually have a firm vision in mind of where I'd like to go with an art reference photo.  There are times when the vision is still fuzzy and the color mixing can help me make more decisions.  


My mixing results do not have to match the photo.  The photo is just a guide, a starting-off point...inspiration.  It took me a long time to let go of the expectation to stick to the photo too closely.  That may have been when my artistic style began growing in a really noticeable way.

Several years ago, my way of mixing pigment was more haphazard.  It was a guess-and-by-golly method!  I'd pick pigments out not really knowing much about their characteristics.  Is it transparent or opaque?  Transparent pigment will show the layers below it.   This brings a luminescence.   Is it more granular...resulting in a mottled effect?  Is it strongly staining?  Lifting and scrubbing later, there would still remain a hint of that pigment.


Why Go To All This Trouble?


1.  Useful Guide For Future Artworks

So here's an example of my earlier color mixing "notes" from previous paintings.  They give me very little information about how I got those sample bits of color.   I may look back now and love something I see there, but without any written guide, it would be hard to duplicate now.


Thursday, February 18, 2016

12 Tips for Making an Art Video


Have you ever learned something totally outside of anything you thought possible?  Sharing my art studio adventures is quite a challenge.  My mind is so full of new information and at times it feels overwhelming.  My 2015 goals have been reviewed.  With a new list of goals for 2016 (some carried over from 2015) I've got my work cut out for me!  I'm not very organized in my methods for tackling these goals.

I'd say spontaneous and sporadic would describe my method... Are you ready for the run down on how this all came to take place in the art studio.  Hang on!


A snapshot from the video Watercolor Background for Poppies.


My Pinterest boards read like this:  Artist Inspiration, Photography, Christy Sheeler Art Studio, Logo and Business Card Design, Blog Tips, Etsy Website Online Selling...and the newest board is Video Tips.  That one is just an itty bitty board, but it will grow as I search out the stuff I need to know.


Why a video?  


In the past, I've taught some beginner watercolor lessons locally.  It was SO much fun!  I was incredibly nervous at the start!!  Once I got the feel for what to teach and how to teach, it was so rewarding.  I've taken a break for now to get my own art flowing again... but I was amazed by the interest to watch me paint.  There's a curiosity and I guess I do relate; I enjoy watching others paint as well.